
SPORTSTER ACCESSORY SLIP-ON MUFFLER KITS
J063792016-08-22
GENERAL
Kit Numbers
64900476, 64900477
Models
For model fitment information, see the P&A retail catalog or the Parts and Accessories section of www.harley-davidson.com (English only).
Installation Requirements
Proper installation of this kit requires the separate purchase of two muffler clamps (A: Part No. 65900012) and two gaskets (B: Part No. 65900017). See Figure 2.
 WARNING
Rider and passenger safety depend upon the correct installation of this kit. Use the appropriate service manual procedures. If the procedure is not within your capabilities or you do not have the correct tools, have a Harley-Davidson dealer perform the installation. Improper installation of this kit could result in death or serious injury. (00333b)
NOTE
This instruction sheet refers to service manual information. A service manual for your year/model motorcycle is required for this installation. One is available from a Harley-Davidson dealer.
Product Information
Noise Emission Warranty
Harley-Davidson warrants that these mufflers, at the time of sale, meet all applicable noise and emissions standards. This warranty extends to the original purchaser for purposes other than resale, and to all subsequent buyers. Direct warranty claims to an authorized Harley-Davidson dealer.
Tampering Prohibition
Regulations prohibit any modifications to this exhaust system which cause the motorcycle to exceed noise standards. Use of a motorcycle with such a modified exhaust system is also prohibited.
NOTE
To avoid penalties under state and local ordinances, repair or replace this product if motorcycle noise increases significantly through use.
PREPARATION
WARNINGTo prevent accidental vehicle start-up, which could cause death or serious injury, remove main fuse before proceeding. (00251b)
NOTE
- WITH security siren: With security fob present, turn ignition switch ON. See the service manual. Disarm security system. Turn ignition switch OFF. IMMEDIATELY remove the main fuse.
- WITHOUT security siren: See the service manual. Remove main fuse.
INSTALLATION
NOTE
Disassemble exhaust system components when the engine is cool. Working on or near the exhaust system when the engine is hot could result in severe burns.
| 1. | Open exhaust shield clamps (3). Remove original equipment (OE) muffler shields (2). Save for installation. | |
| 2. | Remove four screws (4) and washers (5) attaching the interconnect tube assembly (6) to the OE mufflers (7). | |
| 3. | Open muffler clamps (8). Remove OE mufflers (7). See service manual. Discard mufflers, gaskets and clamps. | |
| 4. | Install new exhaust gaskets and muffler clamps (sold separately) onto mufflers. Do not fully tighten clamps now. NOTE The mufflers are position-specific. The rear muffler has an axle nut clearance indentation. | |
| 5. | Install the mufflers to the correct exhaust pipes. Do not fully tighten the clamps now. | |
NOTICE Wipe all fingerprints off of exhaust system components after installation and before starting engine. Oil from hands can leave permanent marks on exhaust system finish. (00346a) | ||
| 6. | Align exhaust system while tightening the four screws (4) and washers (5). Do not fully tighten the screws now. a. Tighten the muffler clamps (8) to 51.2–58.3 N·m (38–43 ft-lbs). b. Tighten the screws (4) to 23–27.1 N·m (17–20 ft-lbs). |

| 1 | Heated oxygen (HO2) sensor (2) |
| 2 | Muffler shield (2) |
| 3 | Exhaust shield clamp |
| 4 | Screw (4) |
| 5 | Flat washer (4) |
| 6 | Interconnect bracket |
| 7 | Muffler (2) |
| 8 | Muffler clamp (2) |
| 9 | Exhaust gasket (2) |
Figure 1. Sportster Slip-On Muffler Installation
SERVICE PARTS
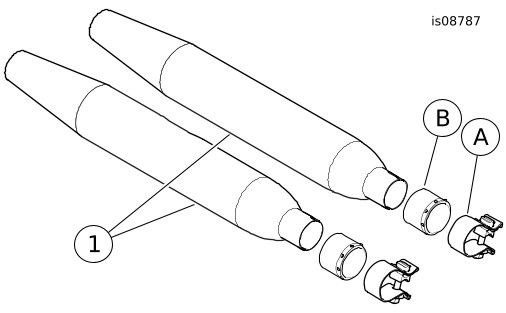
Figure 2. Service Parts: Sportster Accessory Slip-on Muffler Kits
Table 1. Service Parts
Item | Description (Quantity) | Part Number |
|---|---|---|
1 | Shorty Dual Muffler Kit (chrome) Shorty Dual Muffler Kit (black) | 64900477 64900476 |
Items mentioned in text, but not included in
kit. | ||
A | Clamp, muffler (2), Part No. 65900012 | |
B | Gasket, exhaust (2), Part No. 65900017 | |