 WARNING
The automatic-on headlamp feature provides increased visibility of the rider to other motorists. Be sure headlamp is on at all times. Poor visibility of rider to other motorists can result in death or serious injury. (00030b)
Prepare
| 1. | Check tire pressure. | |
| 2. | Adjust suspension preload. Preload adjustments will vary by model. Refer to Before Riding → Suspension Adjustments. a. Nightster (RH975): Adjust suspension preload for a 75 kg (165 lb) rider. b. Sportster S (RH1250S): Adjust suspension preload for rider and intended load. | |
| 3. | Fill fuel tank or add an equal amount of ballast. |
Check Alignment
| 1. | See Figure 1 or Figure 2. Park the motorcycle on a line (1) perpendicular to the wall. | |
| 2. | Set vehicle distance from wall a. Nightster (RH975): See Figure 1. Set vehicle distance from wall to front lens of the headlamp (3). 5.0 m (16.4 ft) b. Sportster S (RH1250S): See Figure 2. Set vehicle distance from wall to front axle (3). 7.6 m (25 ft) | |
| 3. | Draw a vertical line (2) on wall. | |
| 4. | Point the front wheel straight forward at wall. | |
| 5. | Measure distance (4) from floor to center of headlamp. | |
| 6. | With the low beam activated, verify headlamp alignment. a. Nightster (RH975): See Figure 1. top of low beam aligns with cut-off line (5) | |
| 7. | Adjust headlamp, if necessary. |
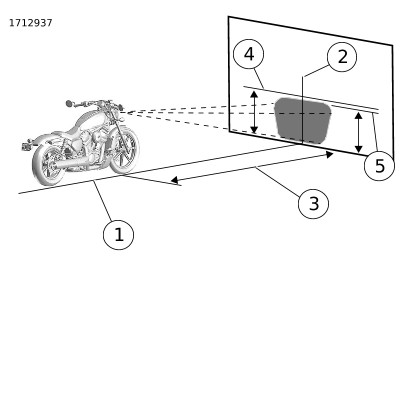
| 1 | Perpendicular line |
| 2 | Vertical line |
| 3 | 5 m (16.4 ft) |
| 4 | Headlamp centerline: With 75kg rider 850 mm (33.5 in) |
| 5 | Cut-off line: With 75kg rider 825 mm (32.5 in) |
Figure 1. Checking Headlamp Alignment (RH975)

| 1 | Perpendicular line |
| 2 | Vertical line |
| 3 | 7.6 m (25 ft) |
| 4 | Headlamp centerline |
| 5 | Horizontal line 6.65 cm (2.6 in) lower than centerline |
Figure 2. Checking Headlamp Alignment (RH1250S)
Adjustment
NOTE
See Figure 3. Some models are equipped with headlamp adjustment tool.
| 8. | Nightster Special (RH975S): See Figure 5. Remove speed screen (1). a. Pull speed screen forward to release posts (3). | |
| 9. | Remove seat. Refer to Service Procedures → Seat. | |
| 10. | See Figure 3.If equipped: Remove headlight adjustment tool from bottom of seat. | |
| 11. | See Figure 4 or Figure 5. Loosen screws on left and right sides of headlamp. | |
| 12. | Set vertical adjustment. | |
| 13. | Tighten screws on left and right sides of headlamp. Torque: 8–10 N·m (71–89 in-lbs) Headlamp screw | |
| 14. | If equipped: Install headlamp adjustment tool in bottom of seat. | |
| 15. | Install seat. Refer to Service Procedures → Seat. | |
| 16. | Nightster Special (RH975S): See Figure 5. Install speed screen (1). NOTE Verify grommets (3) are in place on motorcycle prior to install. a. Align posts (3) with grommets (2) and push until posts are fully engaged. |
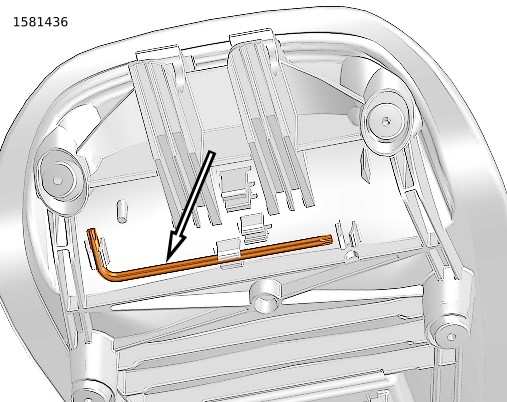
Figure 3. Headlight Adjustment Tool (If Equipped)
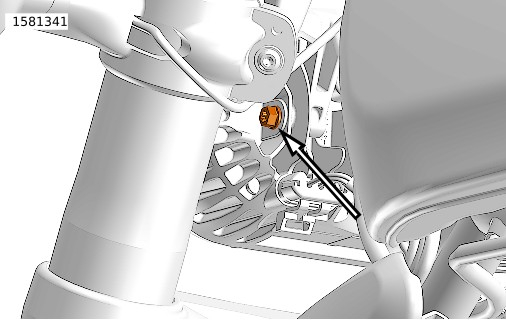
Figure 4. Headlight Adjustment Screw: RH1250S (left side shown)

| 1 | Speed screen |
| 2 | Grommet (3) |
| 3 | Post (3) |
| 4 | Adjustment screw (2) |
Figure 5. Headlight Adjustment Screw: RH975S
Replacing Headlamp
The headlamp contains no replaceable bulbs. The entire assembly must be replaced upon failure. See a Harley-Davidson dealer for service.