 WARNING
The automatic-on headlamp feature provides increased visibility of the rider to other motorists. Be sure headlamp is on at all times. Poor visibility of rider to other motorists can result in death or serious injury. (00030b)
Prepare
| 1. | Check tire pressure. Refer to Before Riding → Checking Tire Pressure and Inspecting Tires. | |
| 2. | Adjust suspension preload for rider/passenger and intended load. Refer to Before Riding → Adjusting Shock Absorbers. | |
| 3. | Fill fuel tank or add an equal amount of ballast. |
Check Alignment
NOTE
Choose a wall in minimum light.
| 1. | See Figure 1. Park motorcycle on a line perpendicular to the wall (1) so front tire is pointed straight forward at the wall. | |
| 2. | Set motorcycle to the specified distance from the front of headlamp to wall (3). | |
| 3. | See Figure 2. With intended rider on motorcycle. Measure distance from floor to dimple (1) on the outer lens. Subtract distance shown. Distance: 25.4 mm (1 in) | |
| 4. | Draw an alignment line (4) at the calculated distance on the wall directly in front of motorcycle. | |
| 5. | Turn off any high beam and auxiliary lights to confirm low beam alignment. | |
| 6. | Low beam is aligned when top of low beam pattern (5) cut off line is aligned with alignment line (4). | |
| 7. | Adjust headlamp, if necessary. |
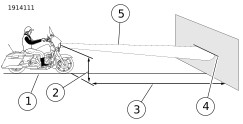
| 1 | Line perpendicular to wall |
| 2 | Distance from floor to dimple on headlamp |
| 3 | Distance from headlamp to wall 5 m (16.4 ft) |
| 4 | Alignment line |
| 5 | Headlamp low beam pattern |
Figure 1. Fork Mounted Fairing: Headlamp Alignment
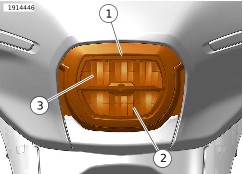
| 1 | Optical center of low beam (dimple in lens). |
| 2 | High beam. |
| 3 | Low beam. |
Figure 2. Fork Mounted Fairing: Dimple
Adjustment
| 1. | See Figure 3. Grasp adjuster cover (2) and pull forward to release it from posts (3). | |
| 2. | Insert flat blade screwdriver in vertical adjuster screw (1). | |
| 3. | Figure 2 Turn adjuster screw CW or CCW to move headlamp low beam pattern (5) up or down until top of light beam meets alignment line (4). | |
| 4. | Remove screwdriver. | |
| 5. | See Figure 3. Install adjuster cover. a. Align adjuster cover (2) with posts (3). b. Press cover firmly onto posts. |
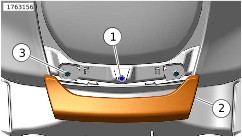
| 1 | Vertical adjuster |
| 2 | Adjuster cover |
| 3 | Post (2) |
Figure 3. Headlamp Adjustment