 WARNING
Do not exceed saddlebag weight capacity. Put equal weight in each bag. Too much weight in saddlebags can cause loss of control, which could result in death or serious injury. (00383a)
NOTE
Maximum saddlebag weight capacity is 6.8 kg (15 lb) in each saddlebag.
Saddlebag Speakers
The saddlebags and speakers are designed to prevent water intrusion and to allow water to drain during washing or riding in all weather. To remove any standing water from the speakers, open the saddlebags and gently shake any remaining water from the speakers.
Lock
See Figure 1. Insert key. Rotate key one-quarter turn toward front of vehicle. Return key to center to remove key.
Unlock
See Figure 1. Insert key. Rotate key one-quarter turn toward rear of vehicle. Return key to center to remove key.
Open
- See Figure 1. Unlock saddlebag.
- Lift the saddlebag lever.
- Lift the lid from the inner side of the saddlebag.
Close
- See Figure 1. Close the saddlebag lid.
- Push the lever down to engage the latches. Check that the lid is secure.
- Lock the saddlebag.
Removal
- See Figure 1. Open the saddlebag.
- See Figure 2. Rotate the mounting studs one-quarter turn counterclockwise to disengage the saddlebag from the mounting bracket.
- Support the saddlebag. Disconnect the audio connector.
- Lift the saddlebag from the saddlebag rail.
NOTE
Some vehicles have mounting studs with a wire form "bail" for easy removal by hand. International models require a flat blade screwdriver.
NOTE
Do not drag or scrape saddlebags on the ground. Set saddlebags on a level surface to prevent tipping. Improper care can damage the saddlebags.
Installation
- See Figure 1. Carefully place saddlebag in position on saddlebag rail and align the mounting studs with the support bracket.
- Support the saddlebag. Connect the audio connector.
- Check that the saddlebag is secure.
- Close and lock the saddlebag.
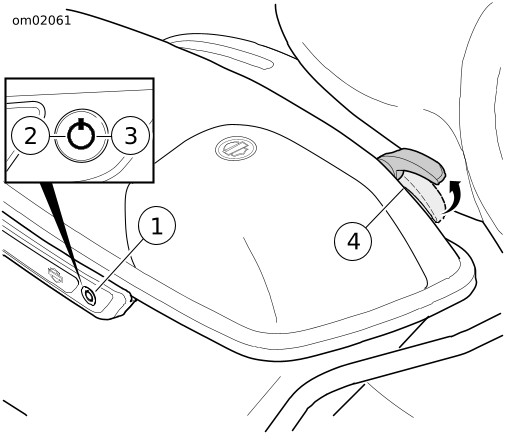
| 1 | Saddlebag lock |
| 2 | Unlock position (toward rear) |
| 3 | Lock position (toward front) |
| 4 | Lever |
Figure 1. Saddlebag
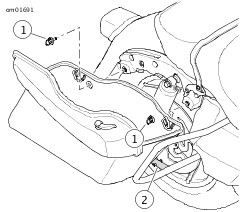
| 1 | Mounting studs |
| 2 | Saddlebag rail |
Figure 2. Saddlebag Removal/Installation
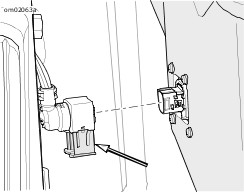
Figure 3. Right Connector Locking Bar

Figure 4. Left Connector Locking Bar
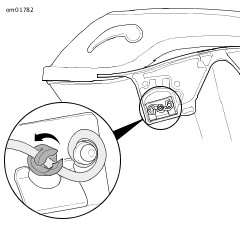
Figure 5. Mounting Stud Installation (cutaway view)